In this post, we will be demonstrating you how to assign multiple IP addresses to a single NIC in Ubuntu OS. We will be demonstrating the procedure on Ubuntu 20.04 (Focal Fossa).
Assigning Multiple IP Addresses to Single NIC Temporarily
In the following section, we will see how to assign a second IP address to a NIC. The second IP address assigned by this method is temporary. Once you reboot the system, it will be removed automatically.
Here are the steps for assigning a second IP address to NIC.
1. First find the current IP address and the name of the interface in your system. To do so, issue the following command in Terminal:
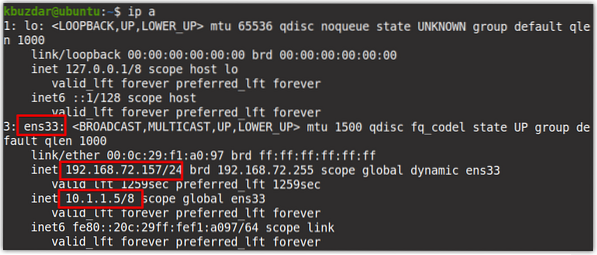
$ ip addrThe following output shows our network interface is ens33 and the current IP address is 192.168.72.157/24 which is the dynamic IP address assigned by DHCP.

2. Let's assign another IP address to the NIC. To assign an additional IP address to your NIC, issue the following command in Terminal:
$ ip adder addReplace the
3. After running the above command, verify if the second IP address has been assigned to your network interface. Run the following command to do so:
$ ip addrHere is the output of the above command which shows two IP addresses assigned to the ens33 network interface.
4. Now try to ping both IP addresses one by one. You can see both IP addresses are reachable. 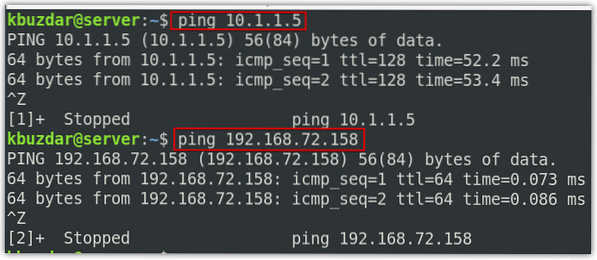
Remove the Multiple IP addresses from NIC
In order to remove the additional IP addresses assigned to a NIC, run the following command:
$ sudo ip addr delReplace the
Assigning Multiple IP Addresses to Single NIC Permanently
In the previous section, we have assigned the second IP address using the “ip addr add” command which is not the permanent method. Once you reboot the system, the IP address removes automatically. In this section, we will see how to make the IP assignment permanent.
In order to assign multiple IP addresses to a single NIC permanently, you will need to configure it in the interfaces configuration file.
1. Edit the interfaces configuration file as follows:
$ sudo nano /etc/network/interfacesAppend the following lines in the file:
ifaceaddress
Replace the
address 10.1.1.5/8
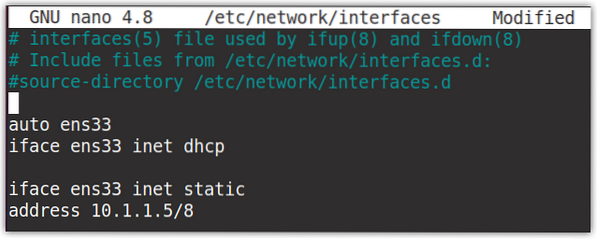
Once you have added the above lines, save, and close the file.
Now restart the networking service to apply the configuration changes you have made above:
$ sudo systemctl restart networkingAlternatively, bring down and bring up the interface to apply the changes:
$ sudo ifdown ens33$ sudo ifup ens33
Now to verify if the additional IP address has assigned to the network interface, use the following command:
$ ip addrAs we have configured the additional IP address in the configuration file, therefore it will remain permanent even if you reboot the system.
Remove the Multiple IP addresses from NIC
You can also remove the additional IP address you have configured in the interfaces configuration file. To do so, simply edit the /etc/network/interfaces file and remove the entry for the additional IP addresses you have added. Then save and close the file and restart the networking services:
$ sudo systemctl restart networkingor bring down and bring up the interface to apply the changes
$ sudo ifdown ens33$ sudo ifup ens33
This is how you can assign multiple IP addresses to a single NIC in Ubuntu OS. In this post, we have discussed both the temporary and permanent methods for assigning the secondary IP address to a single NIC. Following the same methods, you can allocate multiple IP addresses to a single NIC.


